NoiseTECH - Software

Perspectives
App Store Link (Yep, $1.99):
Buy Now:

Perspective control software for the detailed photographer.
Perspectives:
Unleashing the power of the iPhone 4’s rear camera.
Perspectives strives for a very simply goal. Making your photographs a little bit better. It does this be offering multiple advantages over the built in camera:
-
 Perspectives is designed to be simple. It provides access to your camera roll and provides simple calibration of each orientation.
 -
Perspectives uses the built in accelerometer to allow it to auto-level and auto-perspective map you image. More on this in a minute.
-
Perspectives provides real time updating of the “Rule of Thirds” to aid in guiding composition.
-
Perspectives shows an artificial horizon when leveling or perspective mapping is enabled.
-
Perspectives provides the ability to “Stack” multiple images to provide for noise free shots. More on this as well coming up.
-
The ability to tap to focus and double tap to expose.
-
Determine the time and position in the sky of the next sunrise/sunset.
RECOMMENDED: We strongly recommend all iPhone 4 users to go buy a GLIF. The GLIF is a simple and effective tripod adapter for the iPhone 4 and some of the features of Perspectives require a tripod mounted iPhone to work.

Built in leveling and perspective mapping:
-
Do Nothing.
-
Level the shot.
-
Provide full perspective mapping.
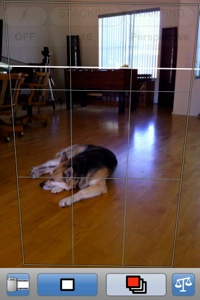
A sample of this is shown to the right using my favorite model Trixie as a guide. In this screen shot, Trixie is doing her favorite of all activities, sleeping. This shows the basic “view finder” with a rule of thirds grid. Pixels outside the grid will be discarded and “mapped” to form a square. This is similar to a TS/E (or perspective controlled lens) that professional photographers use to true up perspective.

Rule of Thirds compositional guidelines:
Perspecitves always overlays a light compositional “Rule of Thirds” guidelines. These guidelines help you frame your shot and keep your subject at the correct point. Likewise, there is a HUD detailing the specifics of how Perspectives is configured. This includes Flahs, stacking parameters and Warping. After a few seconds, the HUD will fade to be almost invisible.


Stacking:
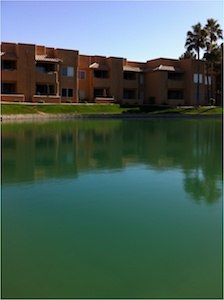
Image stacking is a long used tool used in photography to help bring out subtle detail that is lost in noise or grain. Used even in the film era on astro-photography, stacking of multiple images works wonders at getting rid of random noise and grain. Within the realm of general photography, however, this technique is often overlooked as a method to help get better images under specific conditions. For example, the following images represent the same image taken with stacking of 1, 2, 4, 8, 16, 32, 64 and 128 images.
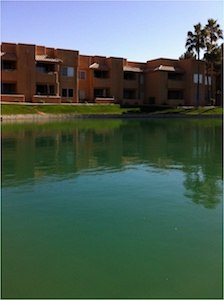
1 Image 2 Images
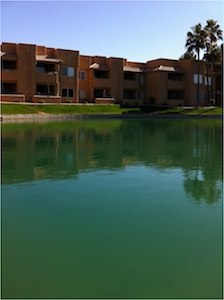
4 Images 8 Images
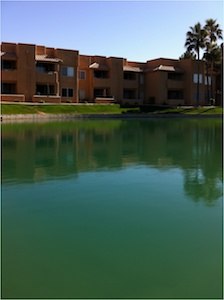
16 Images 32 Images
64 Images (slight focus issue) 128 Images (No focus issues)
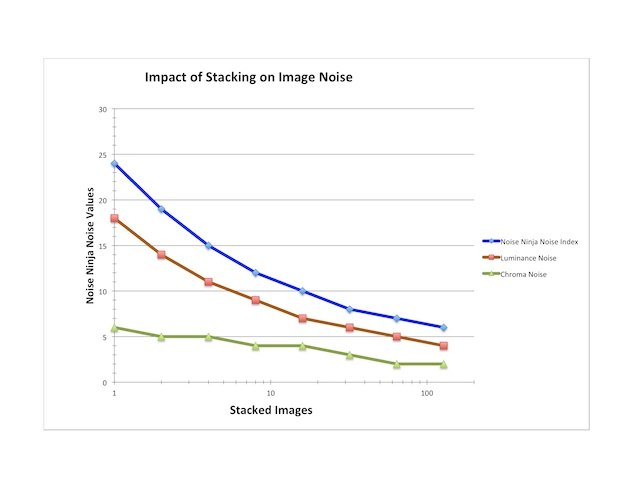
Please feel free to load each image to load the out of iPhone 4 result. Note: Each image is slightly “warped” as perspective mapping was enabled for the finale result. A collection of images like the ones above were taken and run through the program Noise Ninja to perform a noise analysis. The results of the various tests are shown below:
So, stacking has some advantages but it also has limitations. Anything that moves within the frame will tend to either:
-
•Blur
-
•Disappear
In the above images, both effects can be seen. Since it was a windy day, the plam trees show ghosting in image stacks of 2 and 4 and simply blur in stacks of 8-128. This is the save effect that “BULB” on a DSLR would give. Likewise, the water took on a smooth, translucent sheen. This is the same effect used to get the water to take on a milky effect on water falls.

Calibration:
In order for Perspectives to give the best results, each of the 3 orientations need to be calibrated. So it is possible to calibrate one orientation and still have errors in the other 2 orientations. Perspective supports the following orientations:

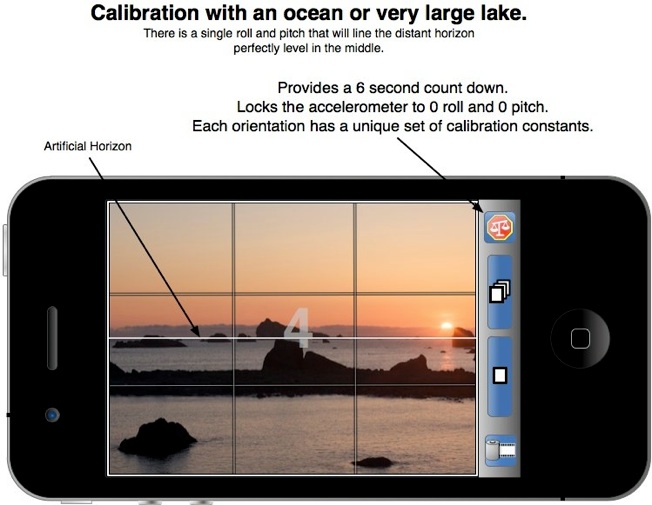
Using the Ocean’s Horizon
To calibrate Perspectives is simple if you live near an Ocean. Simply line the artificial horizon in the middle of the screen with the distant horizon of the ocean and press the calibration button; you will have 6 seconds to make any small adjustments as needed before the calibration is actually taken. The best results are achieved when the iPhone is mounted on a tripod.
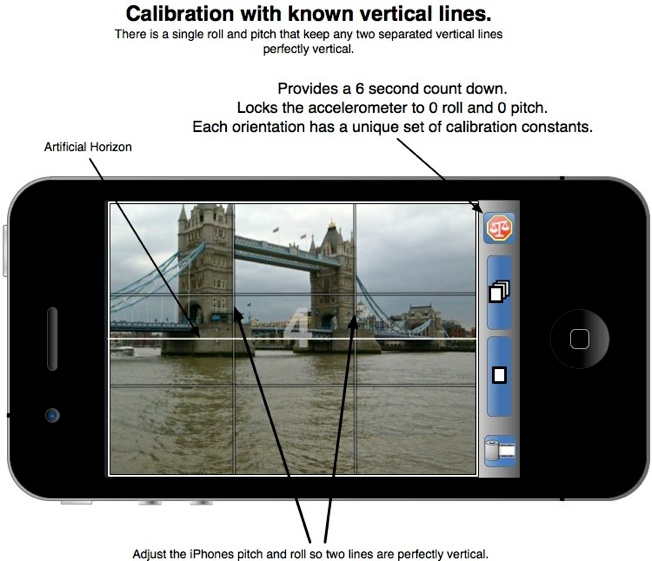
Using two vertical lines
Calibrating using two vertical lines is a little more difficult. The hardest part is finding to lines you know are perfectly vertical. Many buildings simply are not square.
Once found, simply adjust the iPhone until two lines are perfectly vertical. The rule of thirds guides can be used to assist in this. Likewise the artificial horizon will simply line up in the middle when using this method. Once everything is lined up, simply press the calibration button; you will have 6 seconds to make any small adjustments as needed before the calibration is taken. The best results are achieved when the iPhone is mounted on a tripod.

Samples:
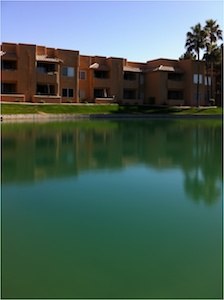
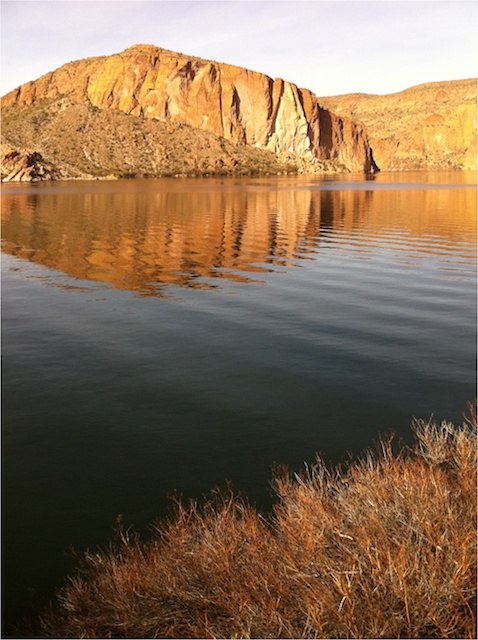
Canyon Lake in mid day light - Image Stacking

This is the basic reference shot. Taken with normal setting giving a result exactly like the standard iPhone 4’s build in camera.
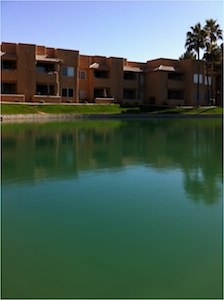
Taken from the same sample as above, notice the slight rotation of about 2 degrees counter-clockwise. The effect is subtle but it does greatly minimize that feeling that the lake is leaning to the right in the first image.
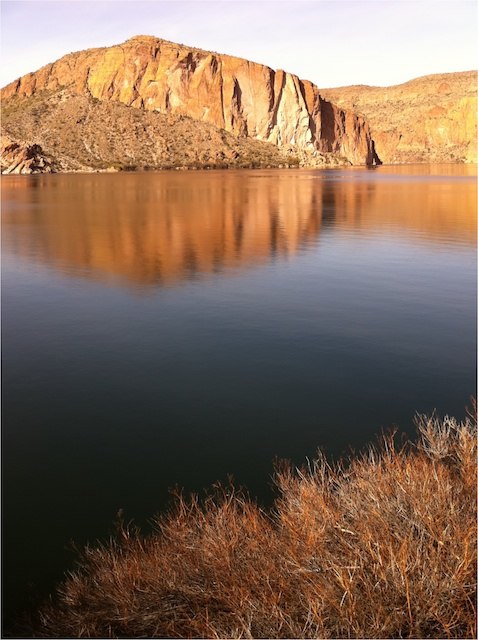
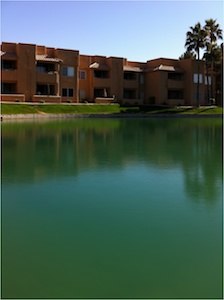
This shot is the same as the above shot but Perspectives “stacked” 32 images. This resulted in two things. The first is, of course a drastic reduction in image noise. The second is the “smoothing” out of the water ripples.
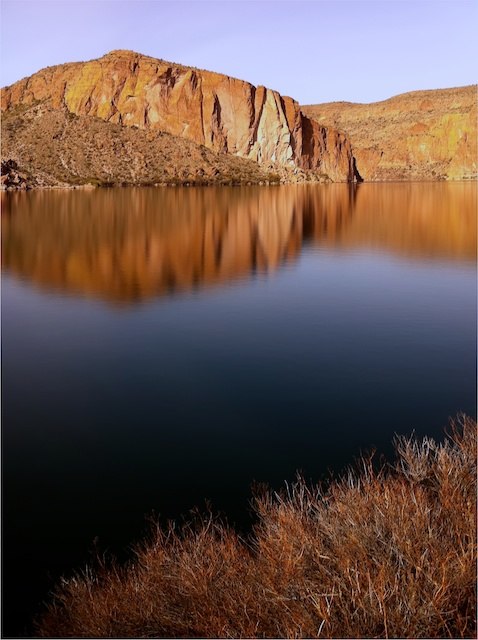
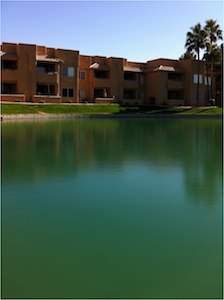
This represents the final image. In this case, I used Apple’s Aperture program (Or Adobe’s LR if you would prefer) to change the WB color temperature to 4260K with a Tint of 17. A -0.5 stop EC was added as well as a bump in contrast by 0.1.
Again, what Perspectives is doing is sublte but very noticeable in the final product. Bu lowering the noise floor, Perspectives gives ample room for image adjustment without excessive noise or posterization effects. But the most important aspect is, Perspectives made sure my starting product was levels and the Perspective was true.

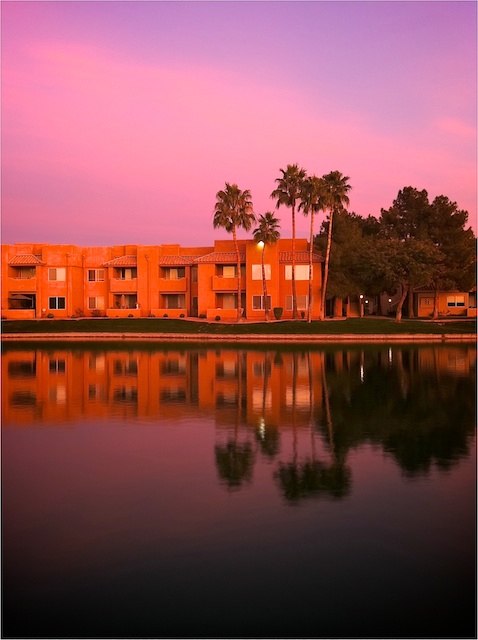
Anderson Springs Sunset: - perspective, stacking, double tap to expose, tap to focus
While sitting with the above dog at the local Coffee Rush, the sunset started to go off. I had no tripod and only my iPhone 4. I set Perspectives up to the following:
-
1)No Flash
-
2)Stacking 16 images
-
3)Warping: Perspective
I found a slightly level platform that would support the iPhone 4 on its flat rectangular base. It was still tilted to one side by about 15 degrees but it would stand on its own. I then did a double tapped to expose the sky and a single tap to focus on the building. This maintained a focused landscape and kept sky with its deep rich reds/blues but it created a very dark image overall:
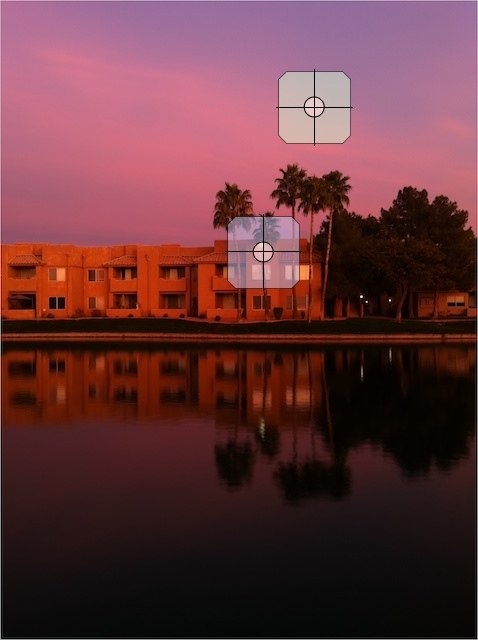
Basic shot out of Perspectives. The green square represents the double tap to expose and the blue square represents the tap to focus. Note that the iPhone was anything but level in this shot but is perfectly level coming out of the phone.
Because the image was captured with 16 images total, however, the image noise was reduced substantially. The above chart shows the noise index dropped from about 25 to about 10. This is about 1.5 stops or thereabouts.
I then used that added SNR to process the image (again using Apple’s Aperture) to get the following image:
3 minute adjustment in Aperture. Added 0.8 stops EC, Levels set to 0.00, 0.19, 0.42, 0.65. A bit of shadows at 8.6 with some sharpening and Vignette. If I did it again, I would have gone for a 32 shot average.
But again, it is because of the stacking these adjustments were able to be done with out getting unreal noise and posterization in the image.

The Simple snap shot of Trixie Dog
The following is a simple grab shot while out i the Superstitions along the Apache Trail. Trixie was exploring the old cattle chute and decided to take the path. She then stopped out and took a pose.
Perspective mapping was turned on, and since the phone was not tripod mounted, stacking was not even an option.
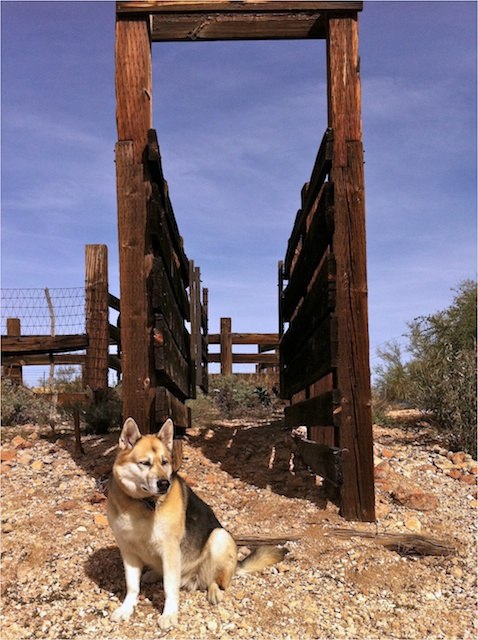
Just had perspective mapping turned on in the Warp button. Otherwise, the perspective would looked more like: http://www.pbase.com/snoyes/image/51384661. This can be interesting at times so Perspectives can enable it and disable image warping in less than a second.

Added latitude when converting to B&W
Black and white is still a popular medium for expressing photographs. When performing the conversion from Color to Black and White, however, the starting tonality of the Blue, Red and Green channels are critical. Because of the high noise floor of cell phones tonaily tends to be less than ideal and posterization becomes extreme with even minimal channel mixing.

Single Image Exposure and post-processed to Black and White in Apple’s Aperture. The image shows massive posterization effects as the Red Channel was exaggerated and the Blue Channel was understated.
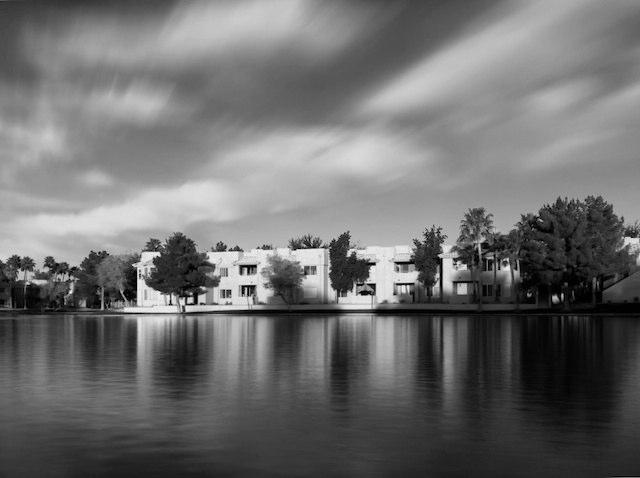
A 16 image stacked Exposure and post-processed to Black and White in Apple’s Aperture with the same settings as the image above. While there is still some posterization, it is greatly minimized and the softened clouds and water give a calming eerie effect to the image.

Perspectives
Buy Now:

